Counter Strike is one of the most popular competitive franchises in the history of gaming, with some of the biggest CS2 tournaments offering tens of thousands in prize money. With stakes this high, the gameplay can get quite intense, particularly at the higher CS2 ranks.
Players are doing anything they can to get an edge over their competition, and one of the more common methods of improving your gameplay is watching your own footage, either by yourself or with a professional coach willing to guide you. The replay system in CS2 provides players with essential tools to review past matches and enhance their decision-making skills.
Luckily, for those who want to easily go over their gameplay footage, the game features an integrated method with CS2 replay controls. Here’s everything you need to know about how to analyze your CS2 replays!
As always, remember that if you want to trade CS2 skins at best prices, SkinsMonkey lets you do that, anytime, anywhere.
How To Record CS2 Replays?
One of the best features added to CS2 was the integrated replay control feature. Each of your CS2 match replays is recorded automatically and can be accessed within the game client. With this method you can access the last eight match replays that you played. To do this all you need to do is:
- Launch CS2
- Click on the TV icon located in the top left corner
- You will find all of the last eight Premier and Competitive matches that you can watch
Bear in mind that this method only works for ranked CS2 matches. However, there's also an alternative method, which uses CS2 console commands and allows you to manually record CS2 replays, witch a start and end of the recording chosen by you. To manually record CS2 demos all you need to do is:
- Once you're in a match, open the developer console (default button ~)
- Type in ‘record file-name'. You can replace the ‘file-name' part with the name of the recording in the game files. Once you enter the command, your client will start recording
- Enter the command ‘stop' to stop recording your demo file. This will immediately cut the recording at the moment that you execute the command.
Once you've recorded your demo, you can access it, along with all the other recordings, in the Steam\steamapps\common\Counter-Strike Global Offensive\game\csgo folder.
How to Watch Replays
Watching replays can also be done via CS2 console commands from the in-game client. This is also very easy to do, however, you need to know the particular replay’s name to access it in the game client. You can also watch downloaded demos by accessing them through the game client. To watch replays simply follow these steps:
- While in the game menu, open the developer console
- Enter the command ‘playdemo file-name’, where ‘file-name’ replace it with the name of your recording
- Watch your demo file in action
While this is very handy and allows you to improve your overall skills, the demo features really shine once you utilize the CS2 replay controls to use them to your full advantage.
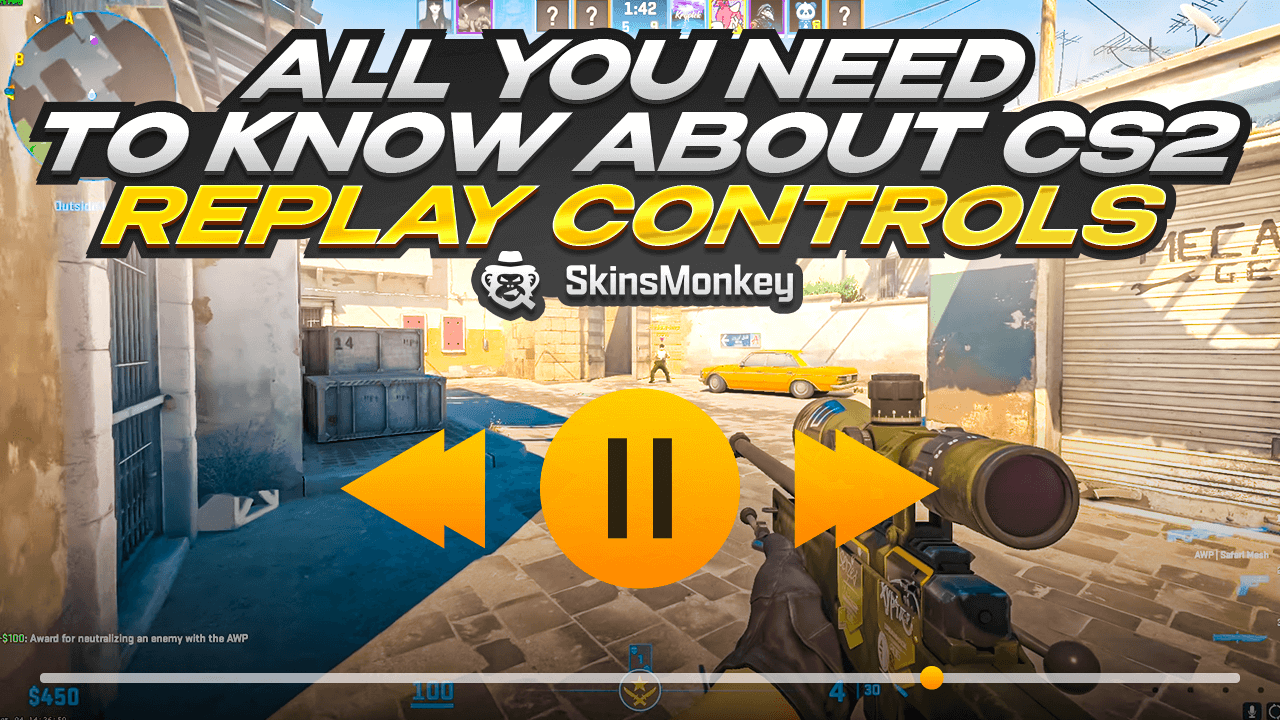
What Are The CS2 Replay Controls?
When you play a CS2 demo replay, you can control the recording, just like in any video player. There are a couple of keybinds and combinations that you can use as CS2 replay controls. These are:
- Shift + F2 – This button combination brings up the demo UI. While it’s covered by default, bringing the UI map makes replay controls far easier, particularly when you want to jump to a specific part of the recording.
- spacebar – Works as a pause button. Can be useful to quickly pause and play fast-paced recordings.
- numeral keys – The numeral keys on your keyboard (1,2,3…) let you control the speed of the recording. This is a great tool for analyzing replays and key moments of your match, and will let you carefully analyze gameplay and what was happening at your own pace. This is the best way to fast forward CS2 replay. Utilize the fast forwarding feature to quickly navigate to significant moments in your replays. You can also use the demo UI to skip rounds and focus on the most important parts of the match.
- Q – The ‘Q’ button is probably the most important one. By pressing Q you activate free camera mode, allowing you to walk around the map without any restrictions, as if you had noclip enabled. With this single tool you can view every part of the battlefield on your own terms.
CS2 Replay Commands
Like with other parts of Counter Strike 2, you can use console commands for replay controls. These commands often provide more control over your CS2 replays. Here are some of the console commands you can use:
- csgo_download_match ID – With this command you can download replays of any of your matches, directly to your computer. In order to use this command, you have to know the match ID, and replace the ‘match ID’ part of the command with its specified number.
- demoui – This command simply brings up the demo UI, allowing for easier demo controls.
- demo_pause – Entering this command pauses your currently running replay, just like hitting the pause. You can then use demo_resume to continue the recording.
- demo_timescale 3 – This command can be used to change the playback speed. The fast forward feature allows you to rapidly skip through less engaging content and focus on significant moments.
- demo_gototick 1min – This console command can be used to jump to a specified moment in the recording. Replace ‘1’ with any minute of the recording that you want to see.
- demo_info – This command will quickly display for you some of the information about the current demo.
In Conclusion
As you can see, CS2 replays play an important part in any CS2 player training. If you want to improve your game quickly, watch some of your previous recording and see if you can spot any mistakes to work on.
If you enjoyed this article, make sure to check out the rest of our blog, where we regularly post more tips, tricks, CS2 news, and even offer giveaways with free CS2 skins!
A true gaming enthusiast, especially Counter-Strike: Global Offensive (CS2) and Rust. At SkinsMonkey, he is involved in creating game guides based on his own experience.